Python-Based AWS Lambda Setup with Docker
8/11/2024
I recently got to play around with deploying Lambda functions on AWS, which wasn't as straightforward as I imagined. Here are the steps I took to launch a Python-based AWS Lambda function running in a Docker environment.

Contents
- The structure of a Lambda function
- Setting up a Python-based Lambda function via Docker
- Conclusion and Next Steps
The structure of a Lambda function
A serverless function (like AWS Lambda) is just a cloud-hosted version of the regular functions we're used to in code. All you need to provide a function definition - your cloud provider handles the details of running your function when called (or "triggered", in Lambda parlance).
It's the familiarity of serverless functions that makes them so useful. (Good) developers already use functions as modular, maintainable pieces of logic in codebases - serverless functions encourage the same design patterns in the cloud. Your system can be decoupled into individual serverless functions, each running and automatically scaling to varying workloads.
In code, a Lambda serverless function is implemented by a handler function.
def lambda_handler(event, context):
    pass
As part of the setup process, we tell AWS to call lambda_handler() when the Lambda is triggered by an event. Lambda will then call the function with the following two parameters:
event- the JSON payload sent by the triggering event indictformat. You control the exact payload schema and contents when defining an event.context- info about the current execution environment. See the docs for what context info you have access to.
You can import modules or define variables and classes all outside the handler function - AWS Lambda will load those dependencies in when calling the handler. Simple enough, right?
Setting up a Python-based Lambda function via Docker
The rest of this post will cover the steps needed to launch a Python-based Lambda function via Docker. We'll be using Python 3.12 for this tutorial, but you can use any Python version supported by Lambda.
Create a folder to store Lambda files
We'll start simple by creating a folder to store all of our Lambda-related files. The name of this folder doesn't really matter, I went with the straightforward my-lambda.
mkdir my-lambda
cd my-lambda
Of course - for an actual Lambda with real use, please name it something more descriptive and identifiable for the sake of maintainability.
Add a handler definition
As we discussed earlier, a Lambda function calls a handler in our code when triggered. Our next step will be to define and implement that handler function.
First, create a Python file named handler.py - our handler function definition will reside here. If you choose to name it something else, keep track of the name for the next step.
touch handler.py
We'll then use our favorite text editor (perhaps Neovim?) to implement the handler. For this example, we'll have our handler do two things:
- Echo the key-value pairs in the event payload
- Return information about our current IP Address via ipinfo.io. As of writing, you don't need an API key to query the IP Info API.
import requests

def lambda_handler(event, context):
    for key in event.keys():
        print(f"{key}: {event[key]}")

    with requests.get("https://ipinfo.io") as response:
        response.raise_for_status()
        return response.json()
If you're using Python's logging module, the base Lambda container image defines its own stream handler for root logger on top of any handlers you define manually. You'll want to disable log propagation to avoid log message duplication.
import logging

logger = logging.getLogger(__name__)
logger.propagate = False # don't propagate messages to root logger
Once you have your handler function implemented to perform your desired logic, we can move on to creating the Docker container image to execute the handler function in.
Define the Docker container image
In general, there are multiple ways to package the handler function so that Lambda can run it. For this tutorial, we'll use a container-based approach. We won't use the alternative archive-based approach as it is much more error-prone to third-party dependency errors (as I learned the hard way) - but it works perfectly fine for simple Lambda functions.
AWS offers multiple ways to define a container image for a Lambda function, but we'll take the simplest route and start from the offical AWS Lambda base images for Python. As we are using Python 3.12, we'll use the version tagged with 3.12 - but you should use the image that corresponds to your Python version as needed.
With that out of the way, here is the Dockerfile for the Lambda container image.
FROM public.ecr.aws/lambda/python:3.12

RUN pip install requests
COPY handler.py ${LAMBDA_TASK_ROOT}
CMD [ "handler.lambda_handler" ]
Apart from pulling the 3.12 version of the base image, the image recipe above contains three other steps:
- Install the
requestspackage, as needed by our handler function. Additional Python packages can also be installed at this step. - Copy
handler.pyinto the Lambda execution root folder, whose value is given by theLAMBDA_TASK_ROOTenvironment variable. You can see the list of Lambda specific environment variables in the base image definition. - Tell the container that the handler function is
lambda_handler()and can be found inhandler.py. More generally, this step's input should be<handler_source_file>.<handler_function_name>- so your command will be different if you named your Python file or handler function differently.
And that's it for the image definition! We'll go ahead and build this image using Docker to make sure everything looks correct. I named my image my-lambda-image - but as before, you can choose your own name. Just keep track of the image name for later parts.
docker build -t my-lambda-image .
Everything should build correctly if your setup is valid, and we can move onto the next step.
You may have to install additional libraries for your Lambda based on what third-party packages you use. The base image derives from Amazon Linux 2023, so if a library is not included in AL2023's package repository, then you may have to install it from source.
Testing our Docker container
At this point, we should have two files in the my-lambda directory.
handler.pywhich defines the handler function for the LambdaDockerfilewhich defines the container image creation recipe
my-lambda
├── Dockerfile
└── handler.py
A benefit of using the offical AWS base image is that we can test our Lambda locally to make sure it runs correctly in the containerized setup. First, run the container, making sure to expose port 8080 of the container to your system. We'll use this port to send a message that triggers the Lambda function.
docker run -p 8080:8080 my-lambda-image
You'll know the container is running correctly if you see a message similar to this:
09 Aug 2024 15:22:28,064 [INFO] (rapid) exec '/var/runtime/bootstrap' (cwd=/var/task, handler=)
For local testing, you will need to set environment variables with your AWS Credentials if your Lambda accesses other AWS services via boto3.
However you will not need to do this in production - each Lambda function runs with a specific IAM role that can be assigned permissions to access necessary services. In the actual Lambda infrastructure, the requisite credentials corresponding to this IAM role will be set.
Then open up another terminal window. We are going to send a HTTP POST request using curl to the endpoint at port 8080 to trigger our Lambda. This POST request includes a test event payload, which in this example is simply a few random keys and values.
curl -XPOST "http://localhost:8080/2015-03-31/functions/function/invocations" -d \
'{"key1": 1, "key2": -3.14159265, "key3": {"innerkey": "hello!"}}'
Send this POST request, and if everything runs correctly, the container should produce an output that looks a bit like the following.
09 Aug 2024 15:24:49,199 [INFO] (rapid) INIT START(type: on-demand, phase: init)
START RequestId: 6fa7492a-5313-478f-8193-1c6ecc5e0bb1 Version: $LATEST
09 Aug 2024 15:24:49,199 [INFO] (rapid) The extension's directory "/opt/extensions" does not exist, assuming no extensions to be loaded.
09 Aug 2024 15:24:49,199 [INFO] (rapid) Starting runtime without AWS_ACCESS_KEY_ID, AWS_SECRET_ACCESS_KEY, AWS_SESSION_TOKEN , Expected?: false
09 Aug 2024 15:24:49,308 [INFO] (rapid) INIT RTDONE(status: success)
09 Aug 2024 15:24:49,308 [INFO] (rapid) INIT REPORT(durationMs: 109.507000)
09 Aug 2024 15:24:49,308 [INFO] (rapid) INVOKE START(requestId: 03bc93e8-7dcc-4bf2-bdca-d615198a48a5)
key1: 1
key2: -3.14159265
key3: {'innerkey': 'hello!'}
END RequestId: 03bc93e8-7dcc-4bf2-bdca-d615198a48a5
REPORT RequestId: 03bc93e8-7dcc-4bf2-bdca-d615198a48a5	Init Duration: 0.11 ms	Duration: 201.31 ms	Billed Duration: 202 ms	Memory Size: 3008 MB	Max Memory Used: 3008 MB
09 Aug 2024 15:24:49,400 [INFO] (rapid) INVOKE RTDONE(status: success, produced bytes: 0, duration: 91.613000ms)
There's a lot to parse here, so let's look at the log messages by phase:
- Init: When the Lambda is triggered, the init phase begins, corresponding to the
INIT *log messages. In this phase, the Lambda loads the handler defintion file plus any extensions (which we didn't cover in this tutorial). - Invoke: The handler function is then invoked, corresponding to the
INVOKE *log messages. Each invocation is given a request ID, in my case03bc93e8-7dcc-4bf2-bdca-d615198a48a5. Our handler function is called, which then prints out the key-value pairs and makes an IP info request. - Shutdown: At the end of the invocation, a nice report is printed with invocation stats, including the billed duration of the invocation and the memory usage. This can be useful to estimate Lambda costs and optimize resource usage.
Note that the Lambda doesn't fully shutdown here - instead the environment still runs, waiting for new invocations.
If you return now to your terminal window from where you sent the POST request, you should see that the JSON-formatted IP Info response was returned to the client:
{
    "ip": "***.***.***.***",
    "hostname": "**************",
    "city": "**************",
    "region": "New York",
    "country": "US",
    "loc": "*******,*******",
    "org": "**************",
    "postal": "*****",
    "timezone": "America/New_York",
    "readme": "https://ipinfo.io/missingauth"
}
I removed some identifying information for my privacy, but your response should look similar. We receive this data as the JSON response was the return value of lambda_handler() in our implementation, which is then returned to the requesting client. In general, you can return any payload from the handler function, and can then send that return value to a number of destinations, including other Lambda functions.
Uploading our container image to ECR
Creating a repository
Once we're satisfied with our Lambda function and are certain that everything works correctly, lets start deploying to production. The first step in this process will be uploading our container image to a repository on AWS Elastic Container Registry.
We'll need to create a repository to store our container images in. Navigate to the ECR page on the AWS Console and press the "Create repository" button.
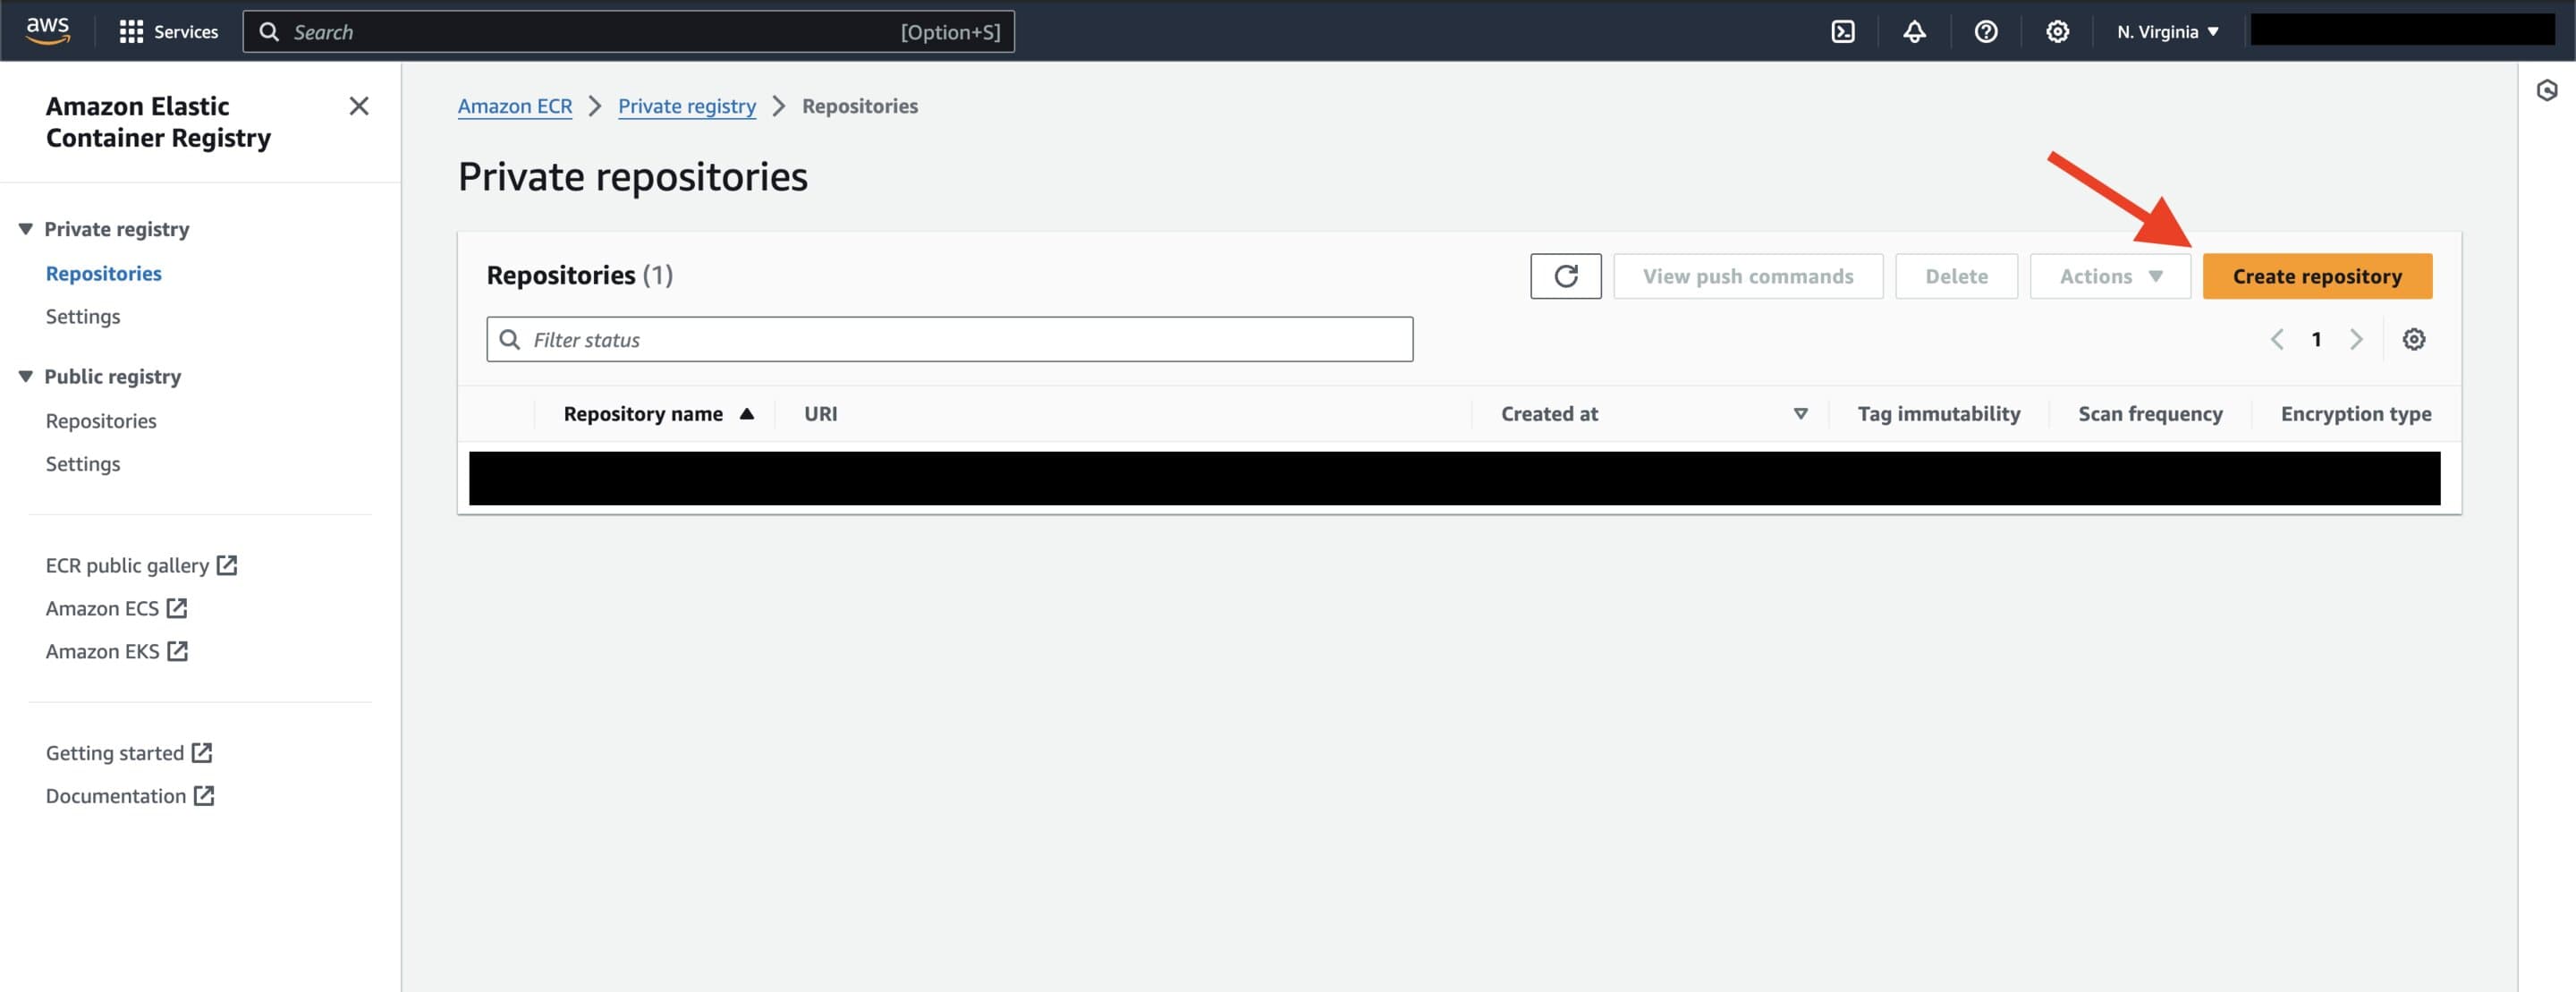
ECR Landing page. To create new repository, click the 'Create repository' button.
Then complete the configuration page to create an ECR repository. I'll call mine my-lambda-images and set it to private access. This repository name becomes part of the repository URI that we'll use in later steps to access our images.
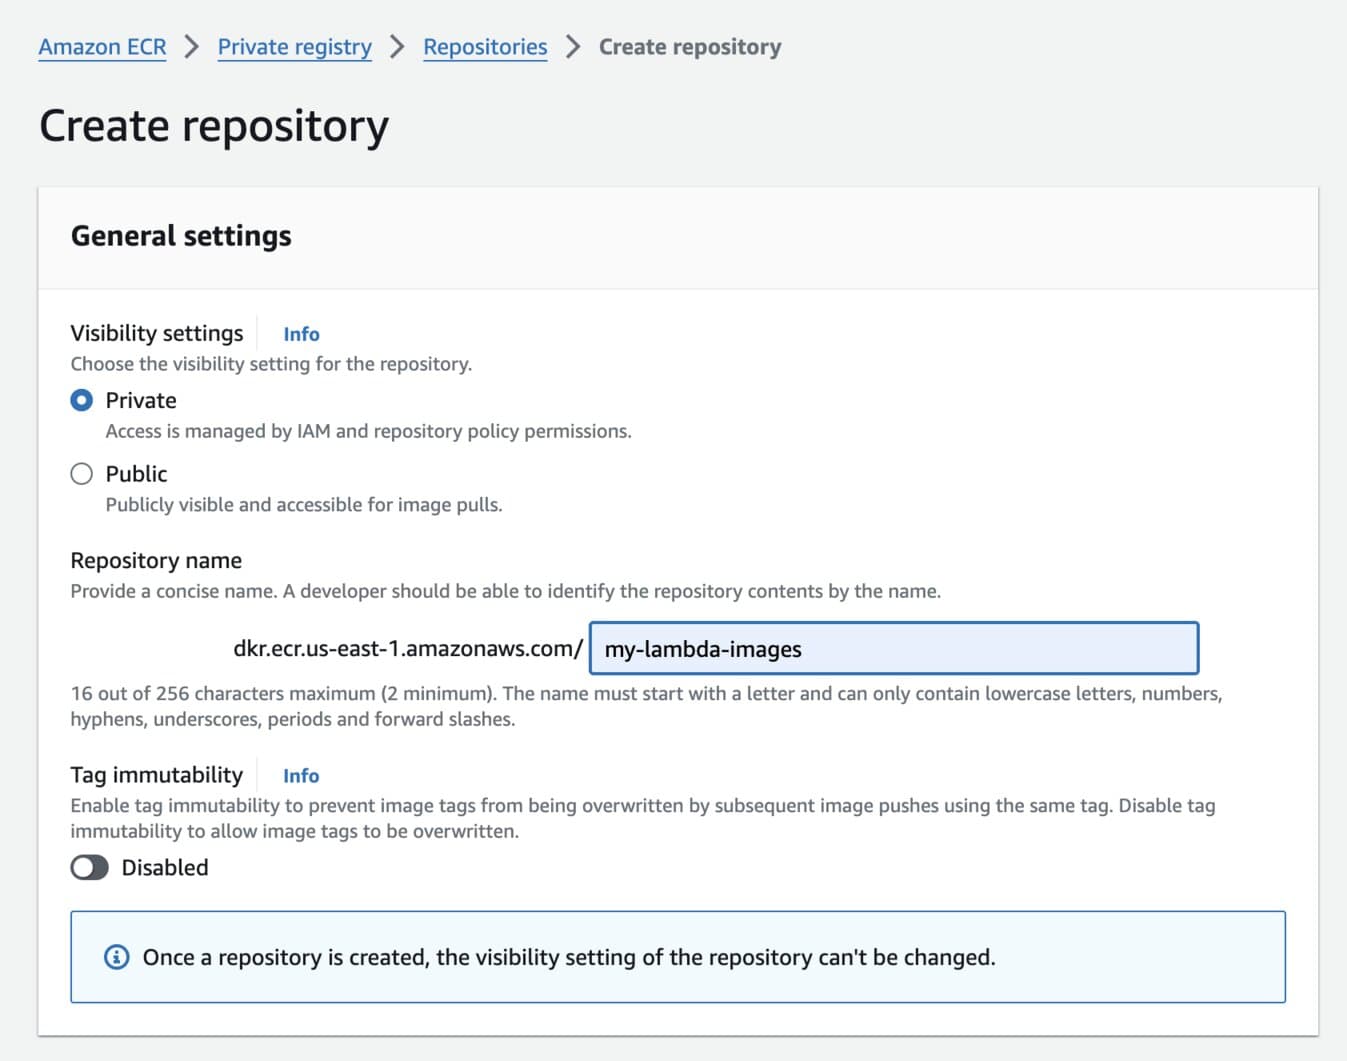
ECR Repostory Creation Screen.
Check out the docs to learn about other configuration options for your repository.
Uploading the Container Image to ECR
Now let's return to the terminal so we can upload the container image to ECR. If you don't already, make sure you have the AWS CLI installed and authenticated with an IAM role that supports pushing to ECR.
You will also need to login to ECR with Docker so you have authenticated access to push to ECR. AWS already has docs on how to do this, so walk through that page before following the rest of this tutorial.
In the previous step, if you're using IAM Identity Center, then you will have to specify your profile name using the --profile option so AWS can validate your permissions. The AWS docs do not explicitly specify this unfortunately.
aws ecr get-login-password --region <your-region> --profile <your-profile-name>
Let's start by tagging our container image with the repository info so Docker knows where to push it to.
docker tag my-lambda-image:latest [aws_account_id].dkr.ecr.[region].amazonaws.com/my-lambda-images:[tag]
The last argument after the repository URI specifies the name to tag this image within the my-lambda-images repository, which can be different from your local tag name.
Then all we have to do is push the tagged image to the repository. Since we tagged the image and logged in earlier, Docker will take care of the rest!
docker push [aws_account_id].dkr.ecr.[region].amazonaws.com/my-lambda-images:[tag]
Once everything is done, we should see our tagged version of the image in the AWS Console view of the my-lambda-images repository.
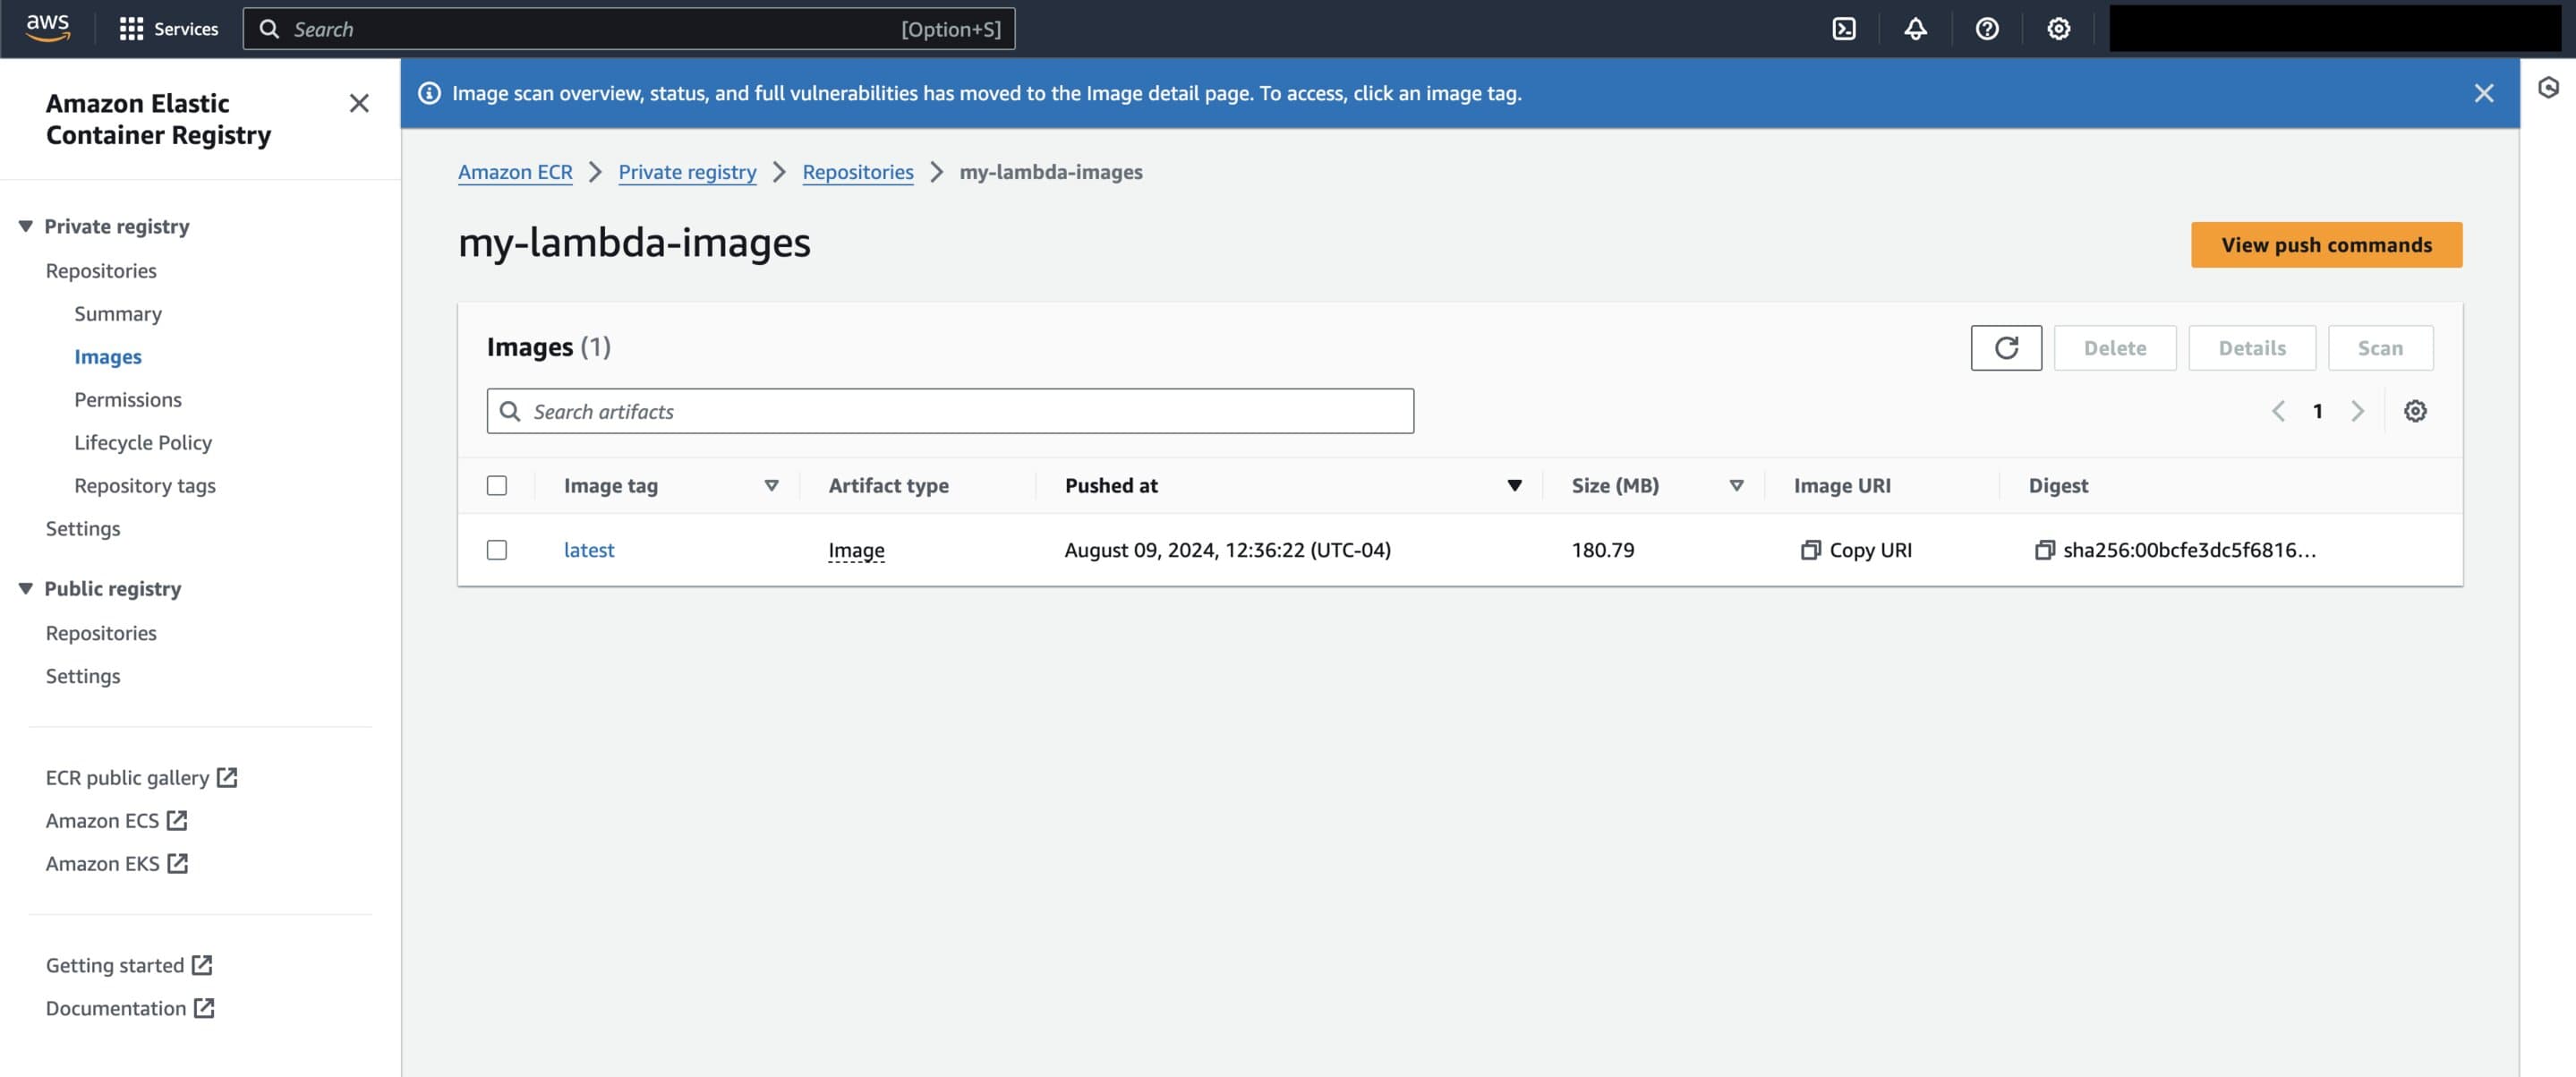
Home page for 'my-lambda-images' repository after image with tag 'latest' was pushed.
Creating our Lambda function
Almost done - now we can create our Lambda function from our container image. Navigate to the Lambda home page on the AWS console. You should then click on the "Create function" to create the Lambda.
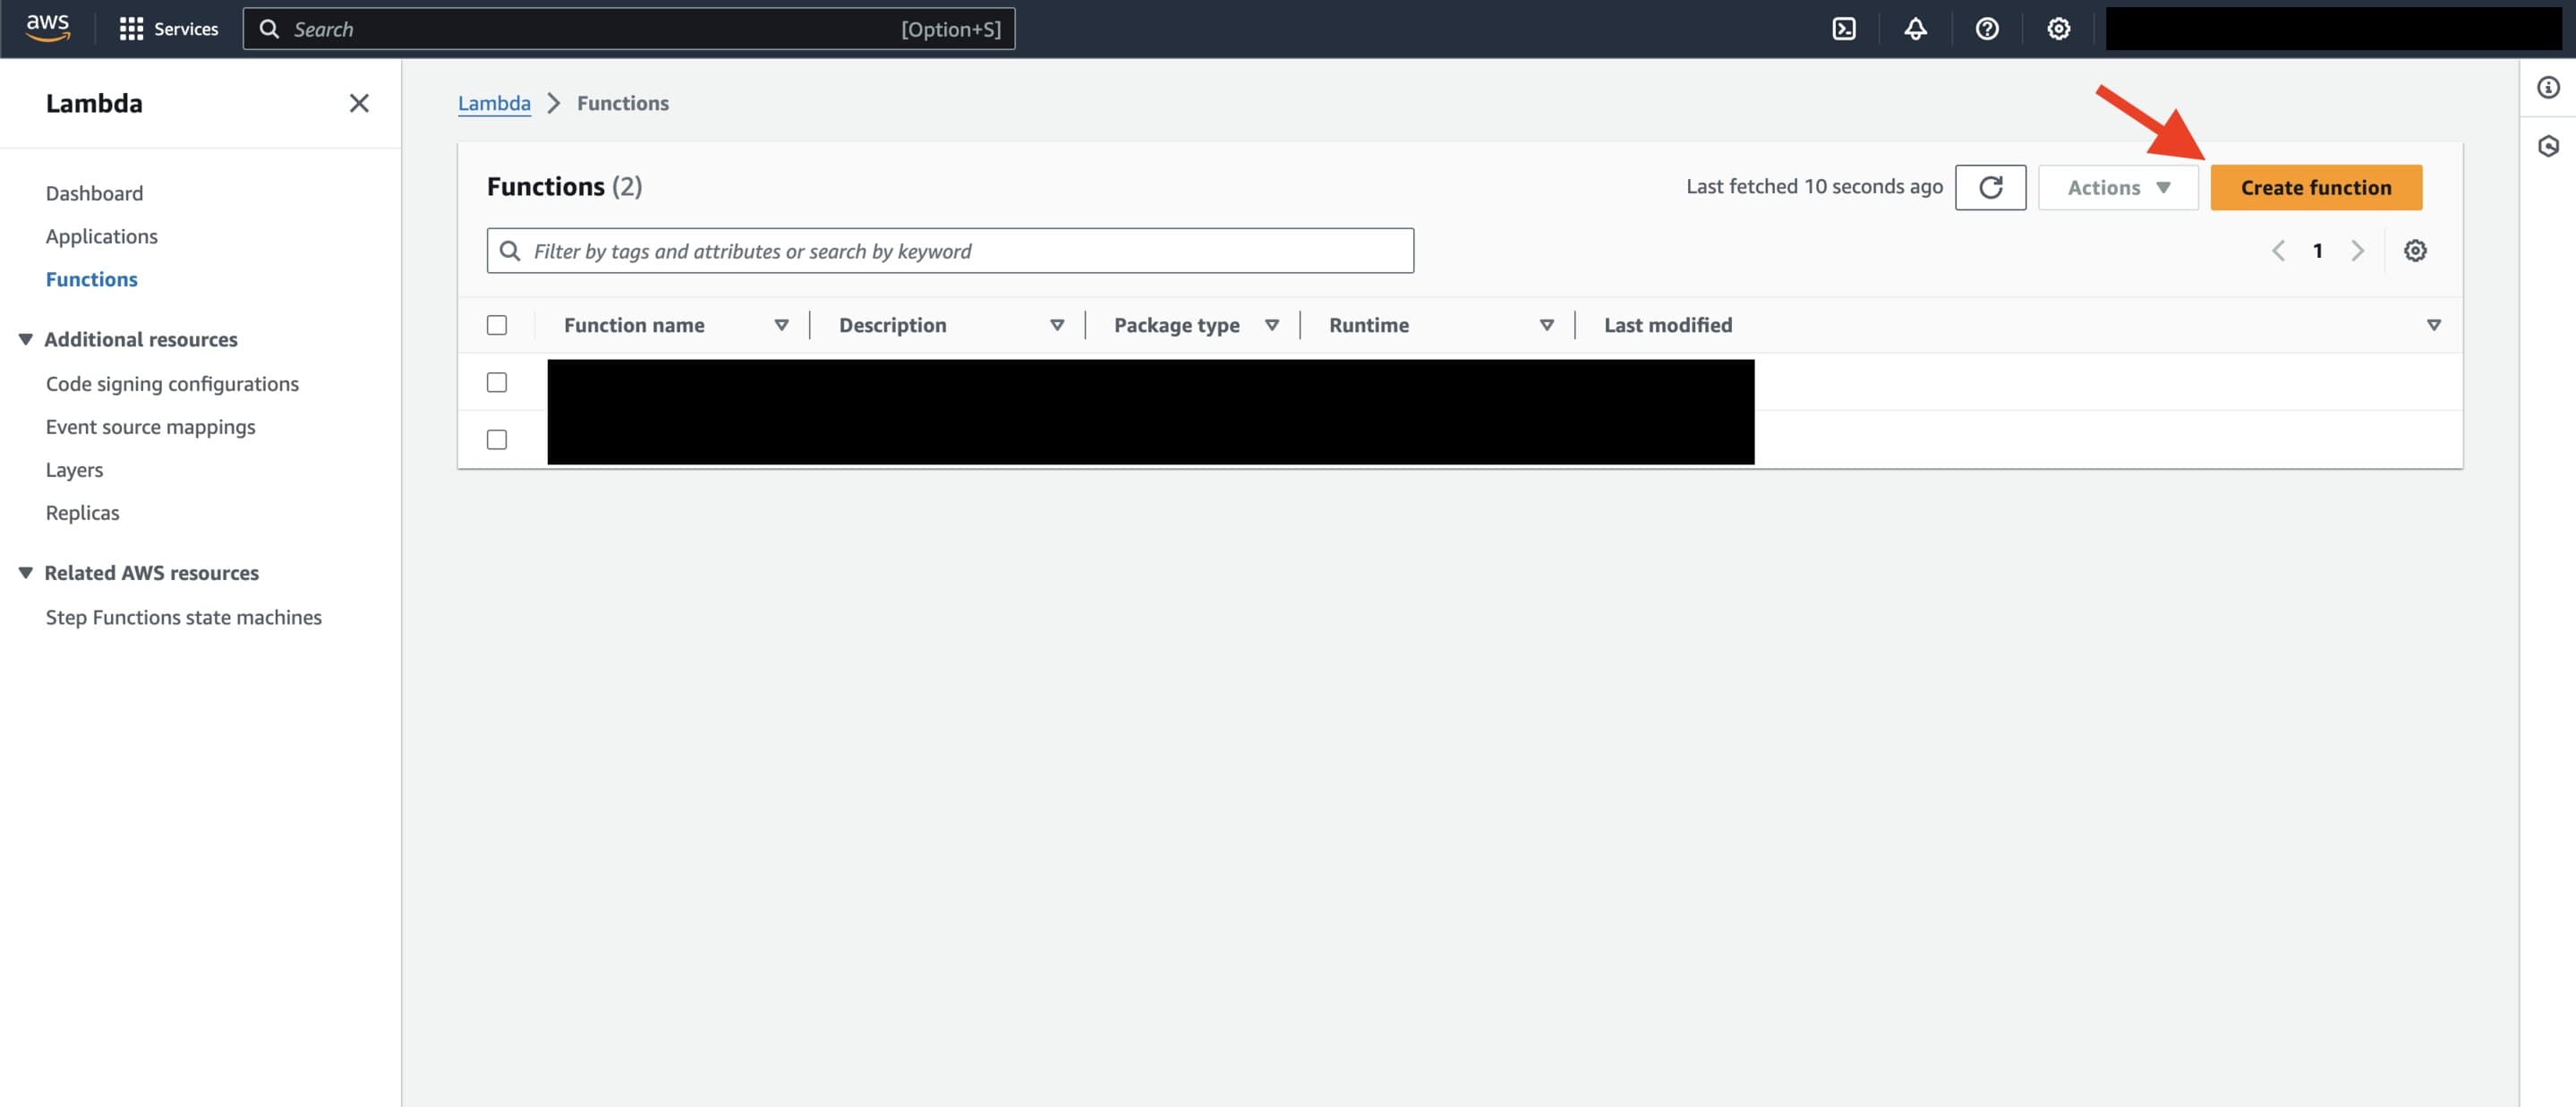
Lambda landing page in the AWS Console. Click 'Create function' to create a Lambda function.
When creating your Lambda function, there are three primary options you should pay attention to:
- Select the "Container image" option for deploying your Lambda function.
- Name your Lambda function whatever your prefer - fitting with the theme so far, I called mine
my-lambda. - In the settings below, specify the container image to load from - the "Browse images" button is helpful in searching through ECR repositories if you have a couple already.
- Select the architecture on which the Lambda should run.
Important: Make sure you choose the same architecture as the computer which your Lambda container image was built on! When we pulled the base Python Lambda image a few steps ago, Docker chose the correct version of the image to run on your computer's architecture, so we need to make sure that the Lambda also uses the same architecture. I use a M-chip MacBook, so I selected "arm64" for my Lambda.
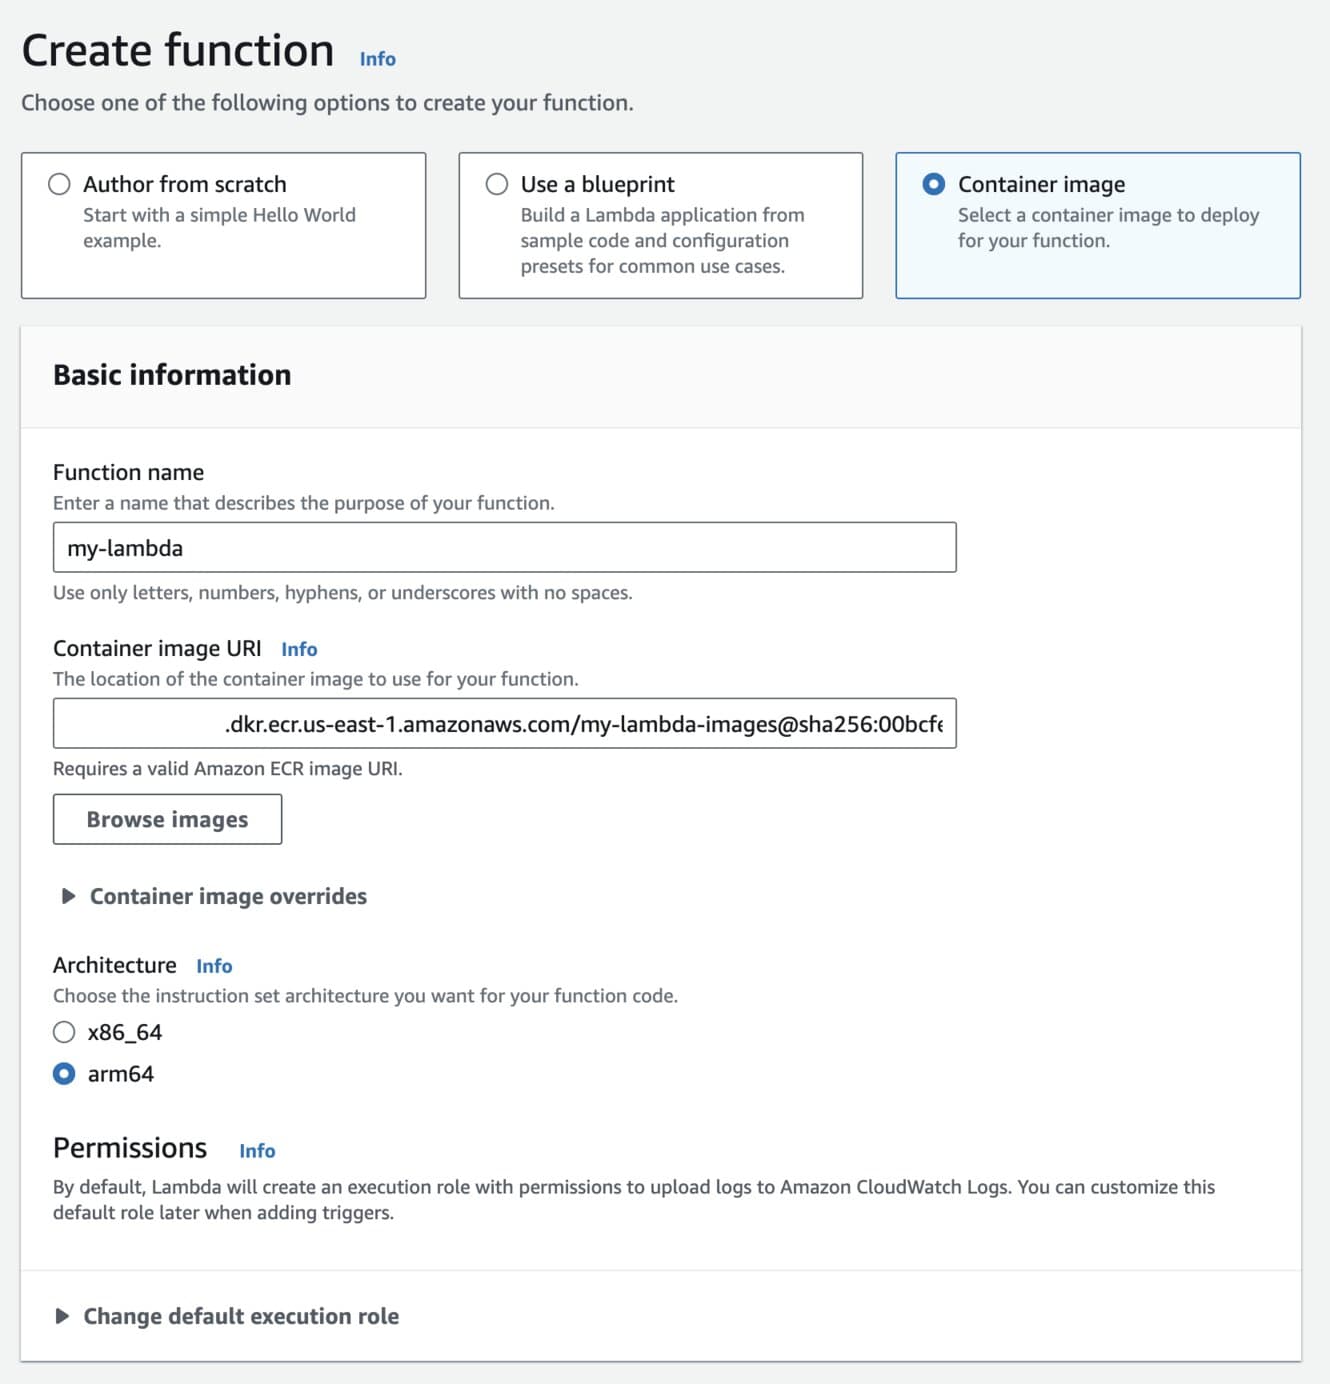
Lambda function creation page in AWS Console.
Go ahead and create the function, and if everything worked smoothly, you should be presented with the my-lambda function home page, similar to below.
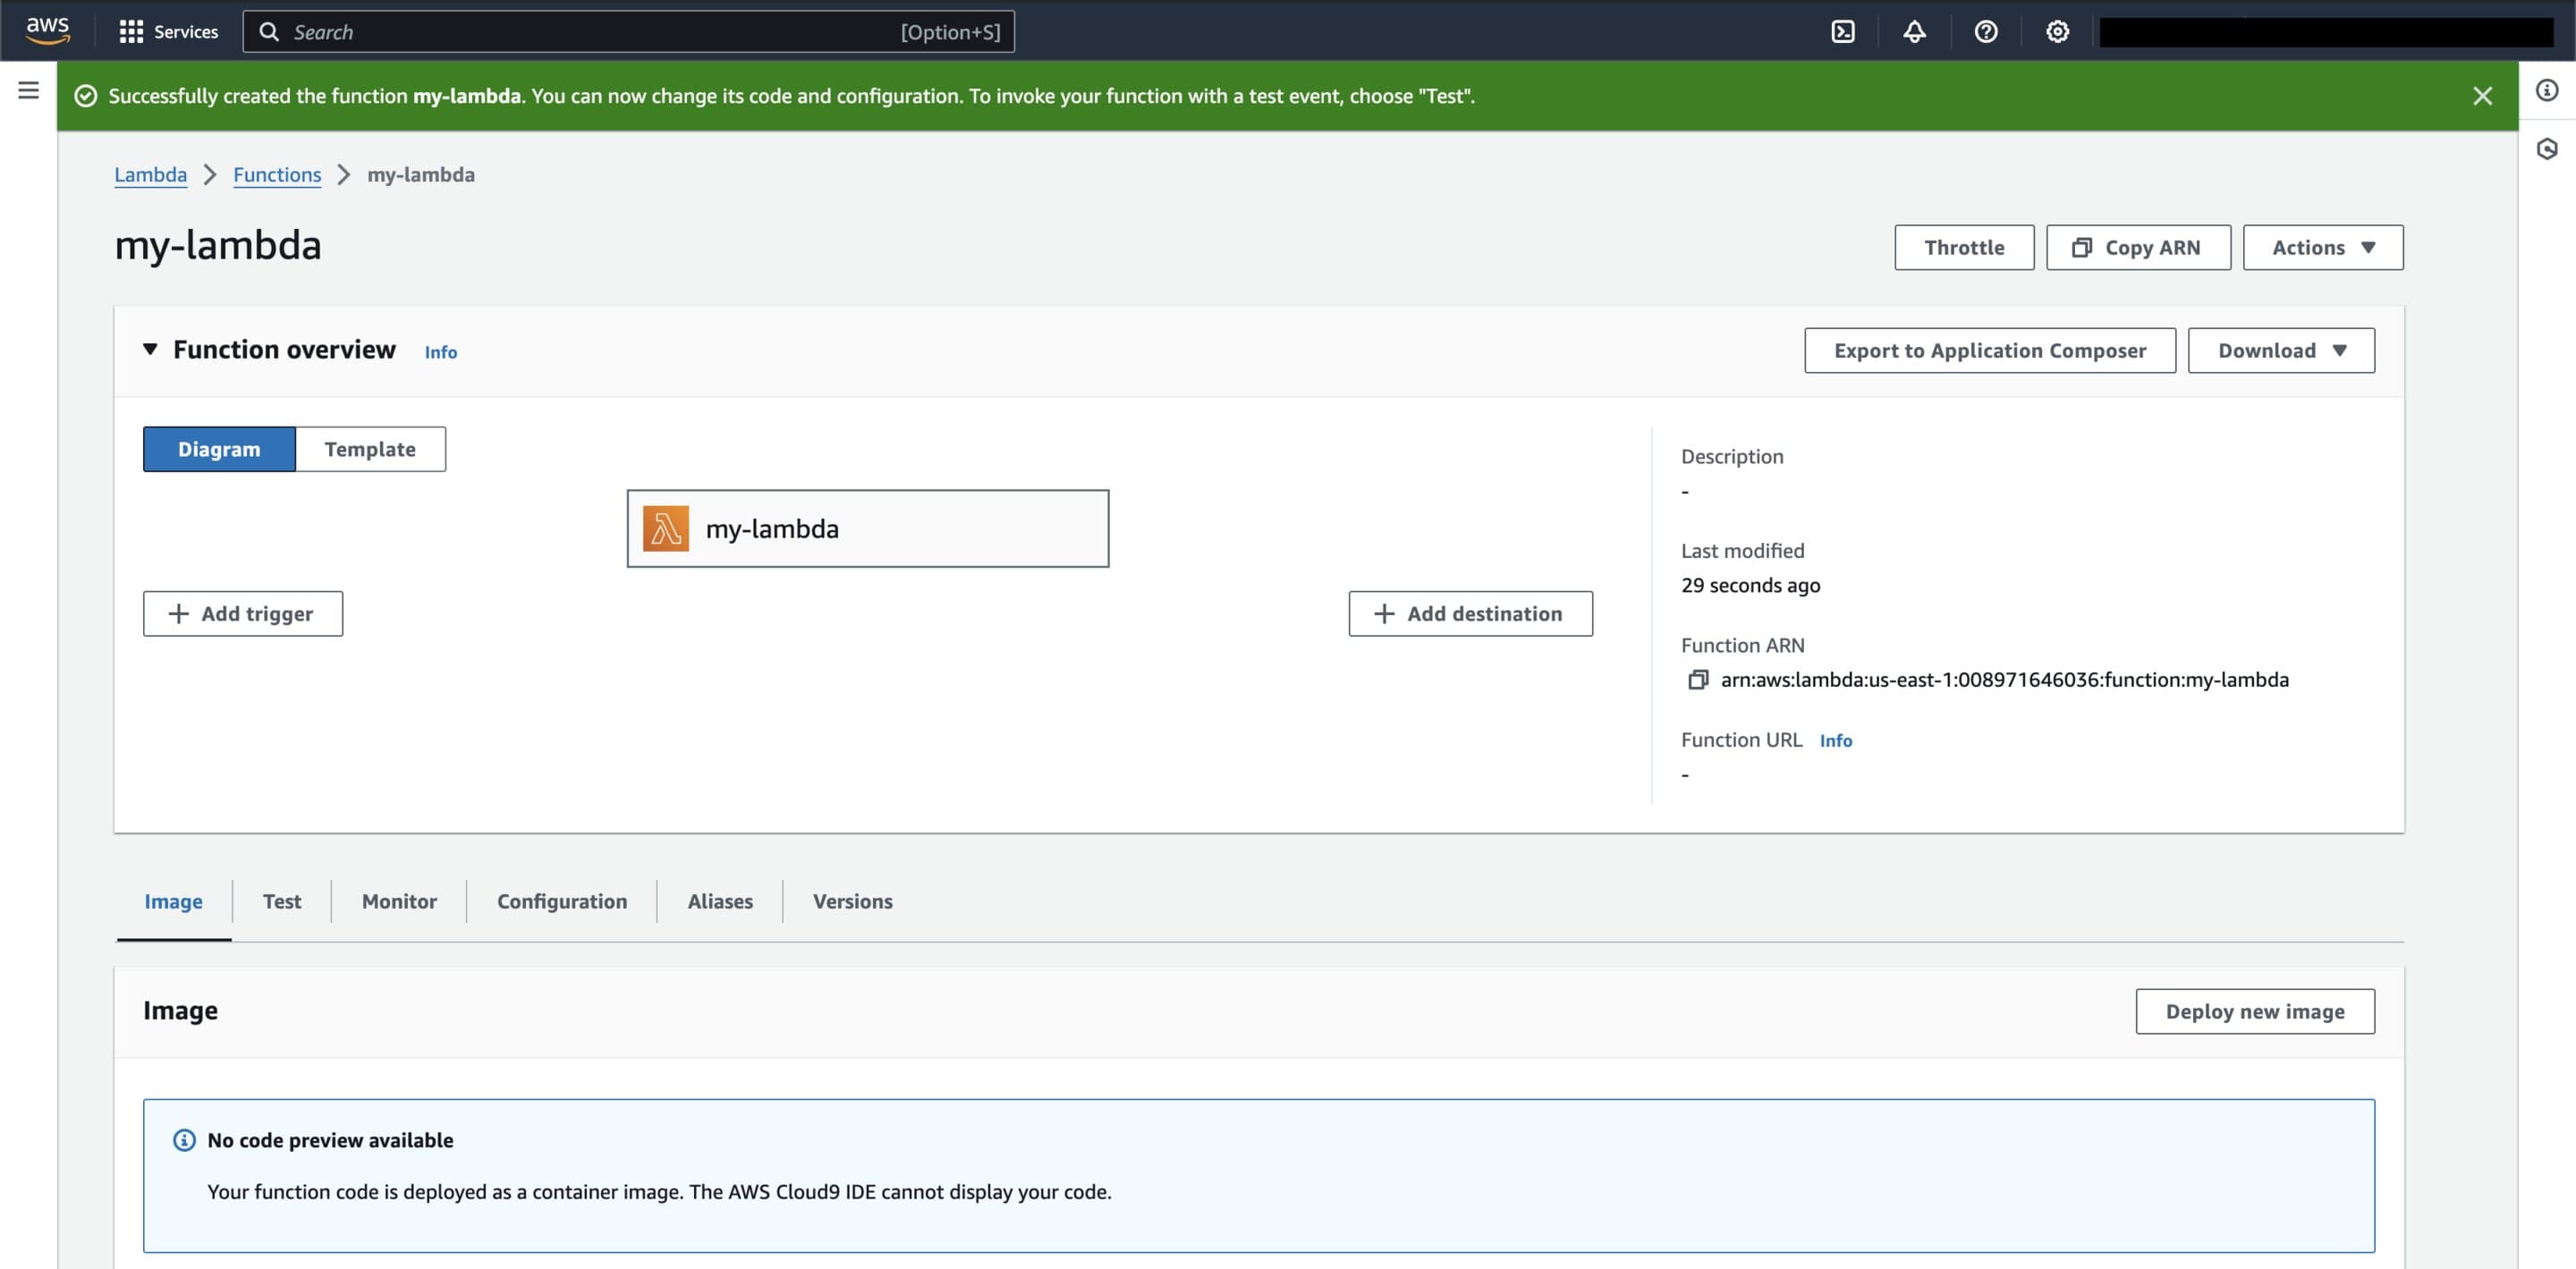
'my-lambda' function home page in the AWS Console after a succesful creation.
Note that we can't edit the function definition since it's packaged as part of the container. This is one of the downsides of a container-based deployment approach. Everytime we want to update our lambda function, we have to:
- edit our source code in
handler.py - generate a new container image
- tag and push the image to ECR
- change the image used by the Lambda function
This makes testing locally even more imperative so that there are fewer bugs in production and fewer times that the entire deployment cycle has to be performed. Or you could just build a CI/CD pipeline to streamline this so you can continue pushing buggy code to production 😔.
Testing our Lambda
Our Lambda is now created and should be ready to go!
If you need to change any Lambda settings, including environment variables and the maximum allowed execution time, you will need to go to the "Configuration" tab on the function home page and edit these settings.
We can test the Lambda by navigating to the "Test" tab on the function home page and creating a test case. Below is a simple test case that sends the exact same payload as the local test we performed earlier in this tutorial.
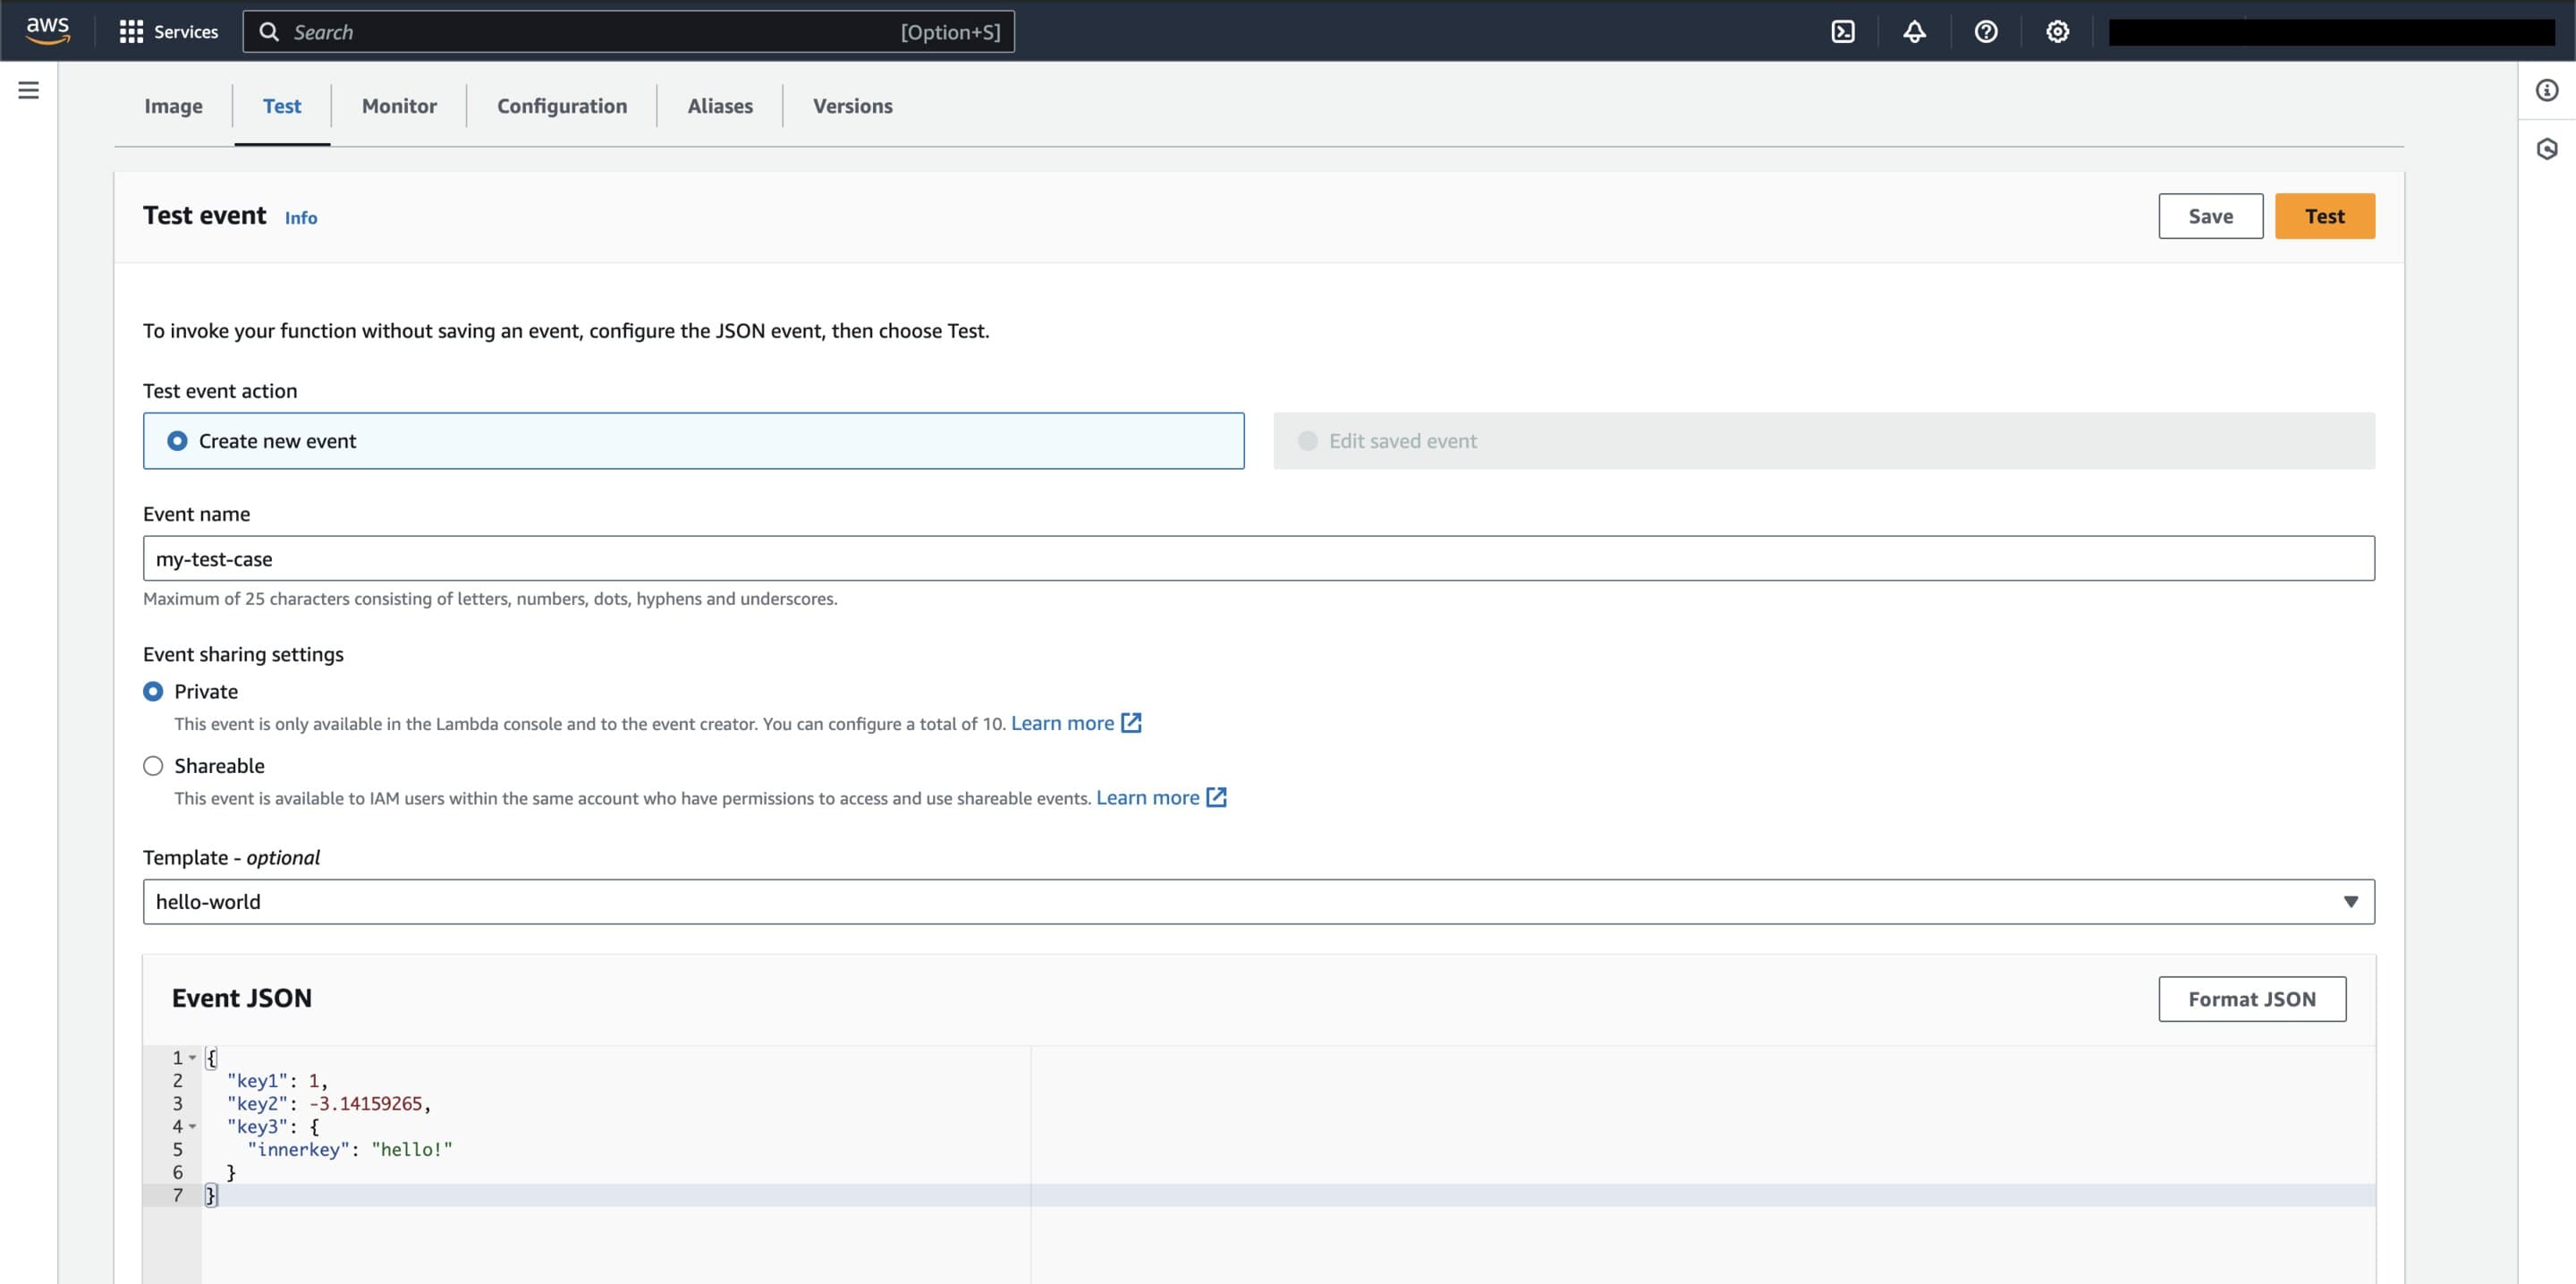
Test creation page for the 'my-lambda' function in the AWS Console. This test sends the same payload as the local test performed earlier in this tutorial.
Press the "Test" button to run the test. A window will appear above the test case editor containing information about the test and whether it succeeded. If everything went alright, you should see a successful execution!
We can view the attached execution report and see how the statistics compare to our local test:
START RequestId: 246837cf-30cb-455b-9df4-d7052574154d Version: $LATEST
key1: 1
key2: -3.14159265
key3: {'innerkey': 'hello!'}
END RequestId: 246837cf-30cb-455b-9df4-d7052574154d
REPORT RequestId: 246837cf-30cb-455b-9df4-d7052574154d	Duration: 117.93 ms	Billed Duration: 1464 ms	Memory Size: 128 MB	Max Memory Used: 57 MB	Init Duration: 1346.07 ms
Notice that while the lambda only took ~118 milliseconds to execute, AWS billed us for nearly 1.5 seconds. This is due to the time needed to initialize and spin up the container - which was nearly 1.35 seconds! This is another downside of a container-based approach - actually creating and running the container can dominate the billed duration of your Lambda invocations.
In that same window, we can also see the return value of the Lambda function, in our case the IP Information data.
{
  "ip": "34.230.24.96",
  "hostname": "ec2-34-230-24-96.compute-1.amazonaws.com",
  "city": "Ashburn",
  "region": "Virginia",
  "country": "US",
  "loc": "39.0437,-77.4875",
  "org": "AS14618 Amazon.com, Inc.",
  "postal": "20147",
  "timezone": "America/New_York",
  "readme": "https://ipinfo.io/missingauth"
}
There is some surprisingly neat information here:
- The
"hostname"value looks suspiciously like a hostname for a EC2 host - it could indicate that Lambdas are implemented on EC2, or at least use similar DNS structures internally. - While AWS has multiple datacenters in the US East 1 region, it looks like this specific execution was ran from the Ashburn, VA center. It doesn't look like this changes between executions, but I haven't tested this rigorously.
- I noticed the IP changes every so often, which means AWS (probably) dynamically assigns publicly routable IP addresses. I'd be curious to know exactly how Lambda functions have IPs assigned - it's not like they use DHCP for virtualized containers. I figure though that's an implementation detail that we're not meant to see.
Conclusion and Next Steps
And that's it! We've launched a simple Python-based Lambda function with Docker. AWS Lambdas are a fairly versatile tool, and there's a bunch more you can explore:
- Connecting your Lambda to other AWS services using
boto3. - Creating triggers for your Lambda function using services like AWS EventBridge, SQS, or even a self-hosted Kafka queue if you have one.
- Learning about the Lambda execution environment, and how you can take advantage of warm starts to amortize container start-up times and improve your Lambda's latency (and resource efficiency) at scale.
- Playing with your configuration and optimizing your handler function to improve function runtime and memory usage - especially since AWS isn't cheap 💸.